Showing posts with label tutorial. Show all posts

Friday, April 18, 2014

Sharing is caring

Today I would like to share some link love with you. There has been some groovy business going on out there in the interwebs.

First up we have an awesome 3 part sew-along skirt  series from Lazy Daisy Jones.


I love this because she is thorough, easy to understand, has great photos, and really takes the scary out of sewing darts and zips! If you have been wanting to tackle these things whilst making yourself a stunning skirt, go check it out!

Next, though you may not have time to whip one of these up before Easter, I think that any time of year is a great time for a bunny backpack, am I right?  


Nancy Langdon from studio TANTRUM has created this crazy cool hip hopper DIY backpack pattern and it's free!!! Which is amazing, but I'd like you to consider her request for a $3 donation to benefit  Ocean Defenders Alliance. Pay it forward folks! You can find the details HERE!

Lastly my dear friend Jane from Flaming Nora has created a fab tutorial for printing images onto fabric using an inkjet computer printer.


Which is perfect timing for those of us participating in the Stitched Journal Project as April is due next Friday!

I hope you have enjoyed these fantastic links, if so please leave a comment on the posts and tell 'em Lola sent you!

Have a wonderful weekend all!

Tuesday, June 25, 2013

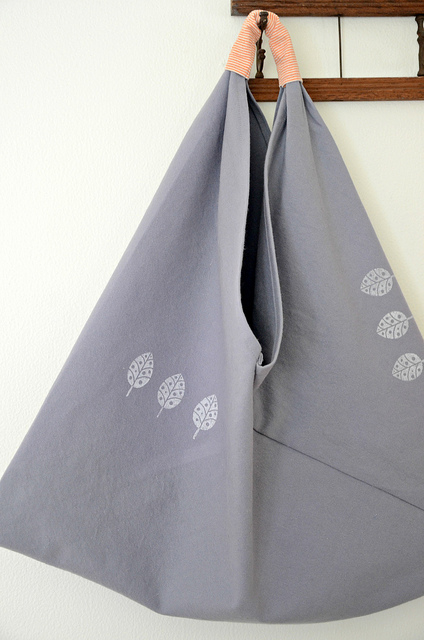
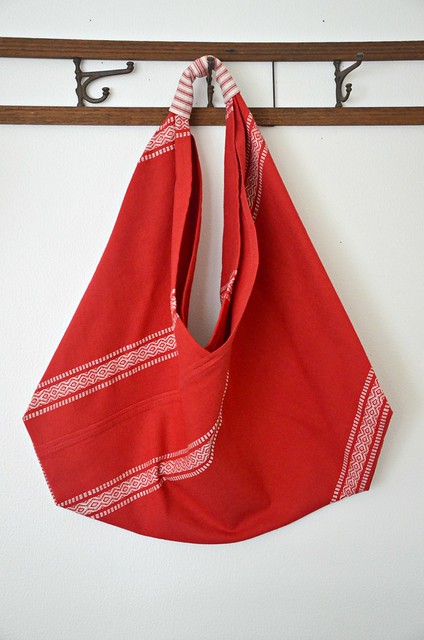
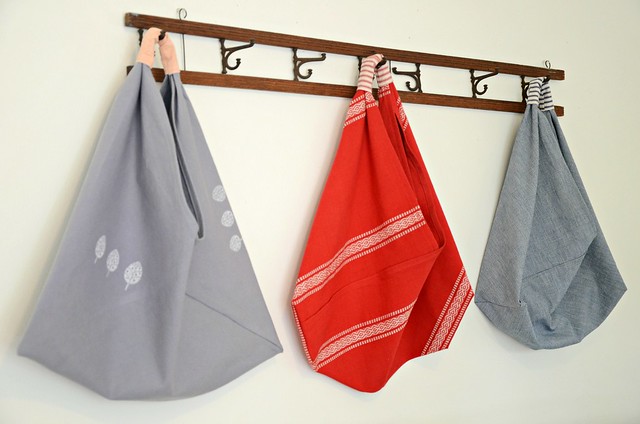
Origami Market Bag Tutorial


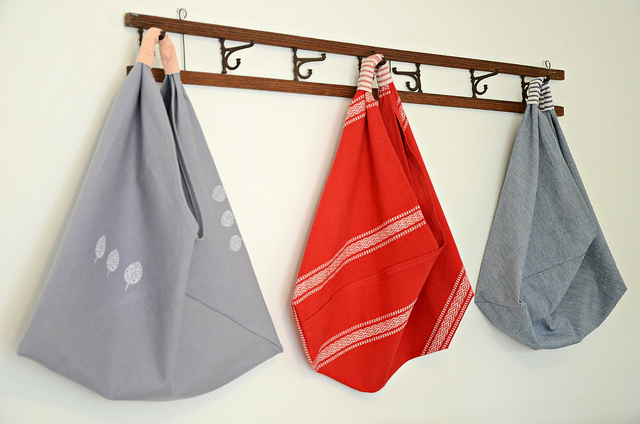
Here is the tutorial for my Origami Market Bag in case you missed it the first time over on WhipUp.

I decided to whip up a simple tutorial for a handmade market bag called “The Origami Market Bag”. The name is taken from its unique folding technique. It makes up in a flash and is nice and roomy for all of your market treasure.

My version of this bag was originally based on a bag I received many, many years ago that was handmade by a family friend from the Philippines. That first bag was made from old cotton rice sacks (similar to vintage flour sacks) and the handles tied in a knot. Not long after receiving it, I made my own bag using a couple of bandannas sewn together. In the years since, I have seen many versions of this very simple bag. Many variations of it have shown up as craft trends come and go, then come around again. I have seen similar patterns in vintage craft books, Japanese craft pattern books and high end leather bags on the runway. I have even seen some in macramé! This is my updated version of that original bag that I received years ago.

You will need fabric, thread, scissors and a sewing machine.

For the fabric, I suggest something a little heavier such as: canvas, linen, denim, or home décor type weight.
We start off with a piece of fabric whose length is 3 times the width. I found using a piece that is 17” X 51” (43cm X 130cm) makes a good size bag; you can play around with sizes if you like.

Once you have cut your piece of fabric to size, hem all of the raw edges.

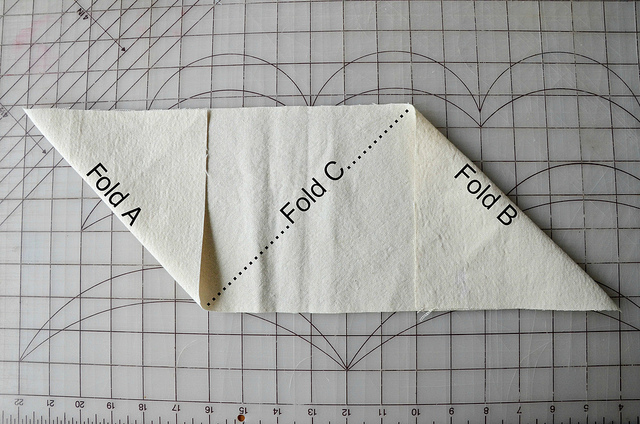
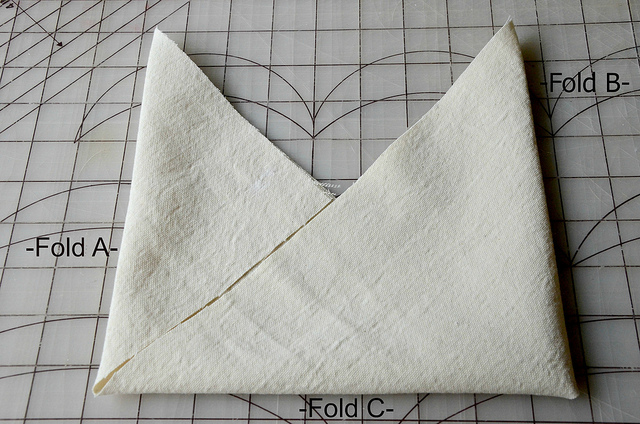
(In the following photos I’ve used a smaller piece of unfinished fabric just to show the folding technique)
Start by laying your fabric with your hems facing away from you and follow the folding technique as shown below.


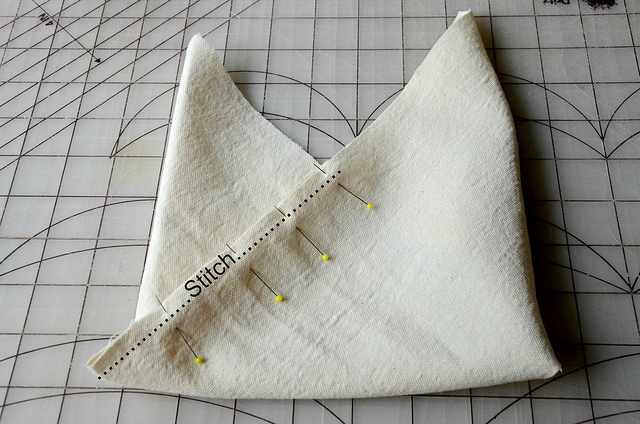
Now pin and stitch as shown for both sides of the bag. I used about a 1cm seam allowance.


It is ok if your bag is a little off center, this may happen if your hems are not perfectly even to one another.
Now that you have sewn your 2 seams, you can leave the bag as is for a nice triangle shape, or you can create some shape by sewing boxed corners, or simple angled corners. Now turn your bag right side out and press if needed.


The next step is to create the handle for your bag. I used some coordinating fabric for a handle.
Cut a piece of fabric that is 3.5” X 6.5” (aprox. 9cm X 16.5cm) turn under and hem the 2 short sides of this piece. Fold the piece in half length-wise with right sides together and stitch raw edges with a ¼” (just under 1cm) seam allowance and turn right side out creating a tube.


Take one of the long top triangles of your bag and thread it through the tube of fabric as shown. Overlap the other top piece with the bit you have threaded through the tube and pin. Now stitch in place. Slide the tube over the stitched overlapped section and center it.


Ta Da! You now have your very own Origami Market Bag!


Go ahead and make a few more, you know you want to!


Please note, this tutorial is intended for personal use only. Therefore, do not reproduce, sell or commercialize in any form. Thanks for understanding!

Tuesday, June 18, 2013

Origami Market Bag Tutorial - On WhipUp


Hey there! Today I have a special tutorial for my Origami Market Bags over at WhipUp!  I am pretty excited about it too!

These roomy over the shoulder bags are perfect for the market, beach, or an overnight get away. They sew up in a snap and make great gifts!


While you are over at WhipUp, be sure to check out the amazing post for pickled radishes and radish leaf pesto by Lindsay of A Wooden Nest !

Happy day to you!

Wednesday, February 13, 2013

Stripey Hearts


I have been tres busy working on a little secret project that I hope to reveal at the end of this week. That means that I haven't been working on any 'day of hearts' business, oh dear me!

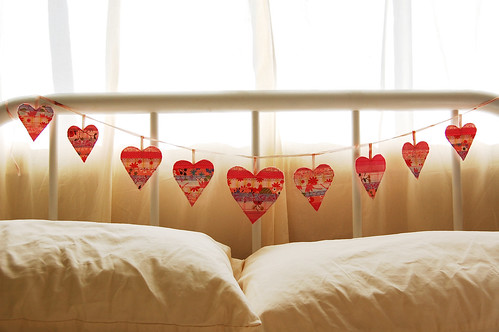
So I took a look back in time to a project that makes a fine last minute Valentine, or anytime project really, and that my friends would be a garland of stripey hearts!

Simply follow my tutorial on making Happy Stripey Ornaments HERE, only instead of sewing your strips of fabric to a sheet of paper, sew them onto a square/sheet of felt. Then out of that you would cut out heart shapes, as many as you please. Finish by sewing around the outer edge of the heart and attaching a loop of ribbon or yarn to the top of the heart in the process. Then string your hearts into a pretty garland of love! Easy peasy no?

And oh so pretty!


Friday, September 21, 2012

Make Bias Binding - Tutorial

Want to know what is really great? Making your own bias tape! Yes you can! It does take a little time and effort, but is well worth it. Because I work primarily with natural fiber fabrics, I find that making my own bias tape out of the same fabric type produces much better results and there is that whole “variety is the spice of life” thing. I do use packaged bias binding as well for the sheer convenience of it, but make my own whenever I can.

I thought perhaps some of you lovely folks might like to have a gander at this tutorial that didn't quite make the final squeeze into my book.

What you will need:
A good size rectangle of fabric (for this example I used about a ½ yard (1/2 meter) of cotton print, but you can use a smaller rectangle no problem)

A fabric marker, pencil, or tailors chalk

A long ruler (clear quilting type works great!)

Rotary cutter & self-healing mat or fabric shears

Bias tape maker tool (not essential, but highly recommended)

Thread

Iron & Ironing board

There are a few different methods to making bias tape, I will be showing you how I make mine, but you should explore other methods to find what suits you best.

Bias tape making tools are pretty nifty and inexpensive gadgets that come in a couple different sizes from ¼” up to 2”. The width marked on the package is for single fold bias tape, so a 1” bias maker tool will make ½” double fold, etc.
Clover makes several sizes of this great tool.

To Make: Click the pics to enlarge for detail

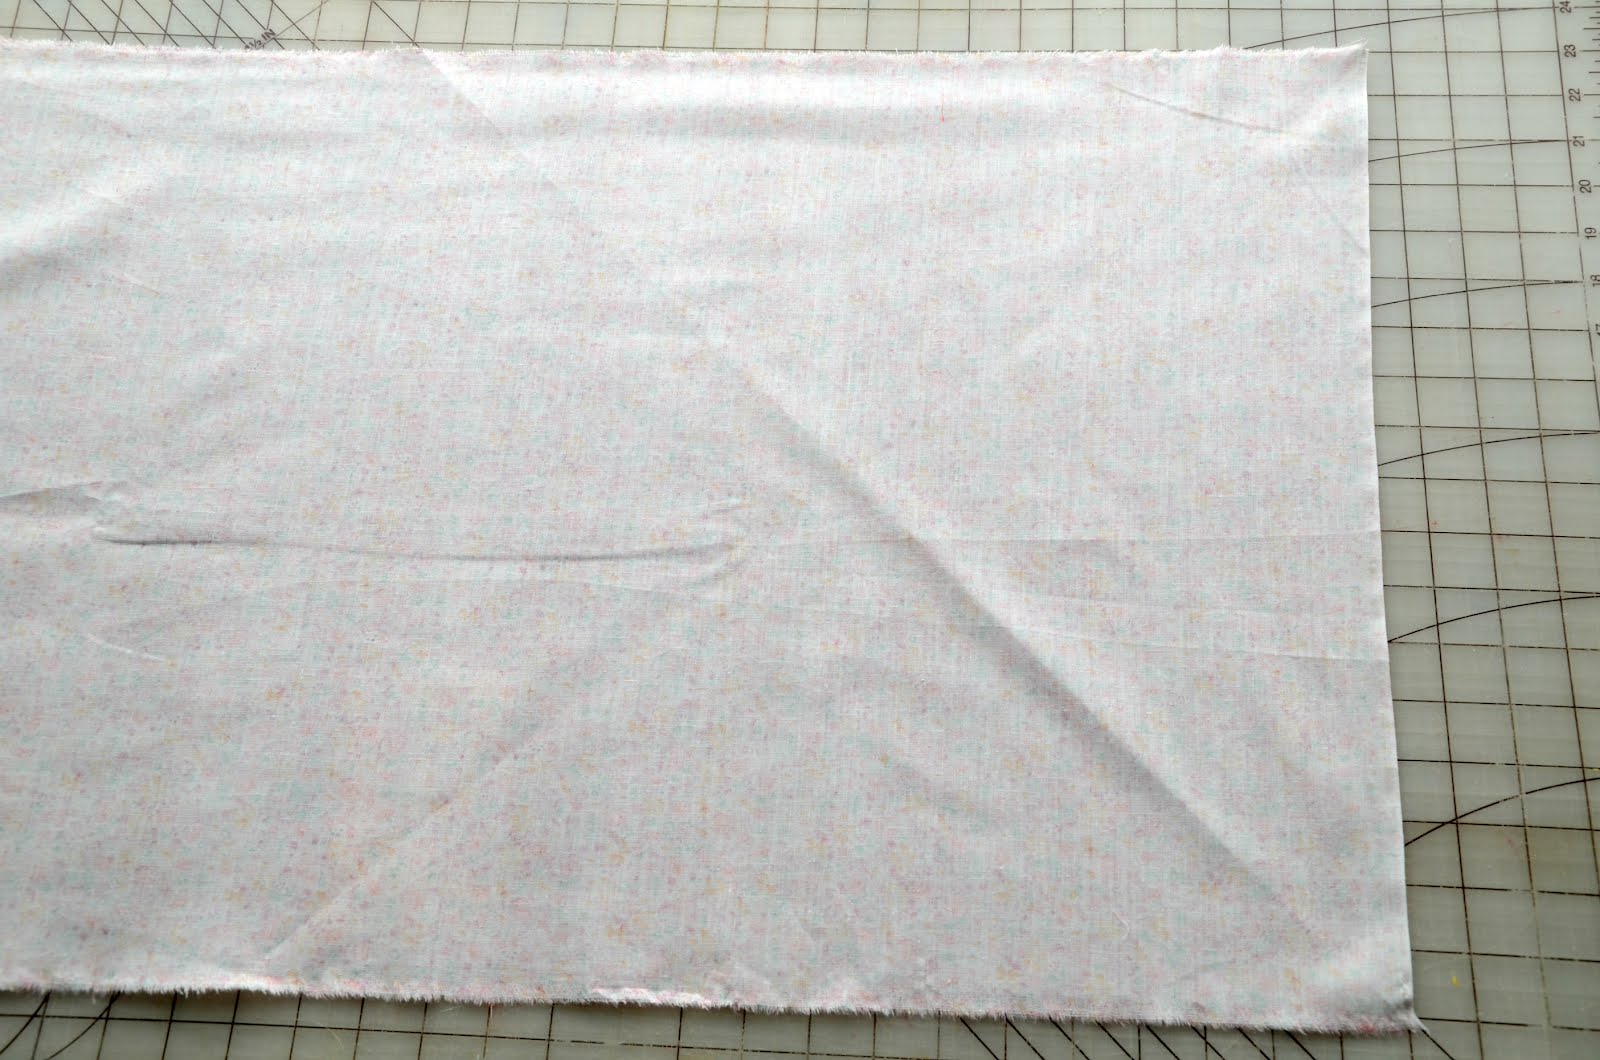
Lay out your rectangle of fabric wrong side up. To find the bias, simply fold the fabric so that the edges meet to form a triangle as shown. Press the fold and this line is the bias grain. Unfold fabric.


Using a long ruler, begin marking off strips along the bias by measuring equal distances from the line you pressed. Your strips should be twice the width of your completed bias tape. Since I am making 1” (2.5cm) bias tape, my strips are going to be 2” (5cm) wide. As I get close to the corner, the strips become quite small so I generally discard those as I don’t want to bother with the really little bits.

Once you have marked off your strips, use a rotary cutter, ruler and self sealing mat, or fabric shears to cut along the lines to make your strips. I then cut off the angled ends of the strips as shown.


Place two strips at 90 degree angles with the right sides together, raw edges matching and pin in place. Sew diagonally across the two strips as shown. Continue sewing the remaining strips together in the same manner to create one long strip. Sew each one the same way so that your seams are all in the same direction. Trim all of your seam allowances to a scant ¼” (6mm) and press the seams open. Trim the seam bits again.


Now that you have a nice long bias strip, let's make it into binding!

Bias Tool Method:
To insert the strip into the bias tape maker tool, fold one end into a point with the wrong side facing up, insert the strip into the wide end of the tool. You can use the tip of a seam ripper to gently guide the strip through. Make sure that your strip is centered in the tool as shown.


Gently pull the tool as you hold the end of the strip and press with the iron as you go. Continue to press the entire length of the strip. You now have a nice amount of single fold bias tape. If you would like to make it into double fold bias tape, simply fold the tape in half with the single folds on the inside and press.


So, the little Bias Maker Tool is totally worth investing a few dollars in!

You can do all of this without the handy little tool. Begin by folding your strip in half wrong sides together and press to create a center crease. Open up the strip and fold both raw edges in to meet the center crease and press for single fold bias tape. Fold in half again as shown above to create double fold bias tape.

Now wrap your sweet new bias tape around a bit of cardboard to keep it nice and neat.


How much bias tape will it make? You can first calculate the area of your fabric rectangle by multiplying the length by the width, and then divide that number by the width of your strips. This will give you a rough approximation since you may not be using the smaller corner strips of the fabric. To tell you the truth, I don't do the math, I just go with this bit:

A half yard of fabric will yield a good several yards of bias binding of most widths.

I will often make a smaller amount for a specific project that requires only a little bit of bias tape, so it's up to you how much you make at any given time.

Now, go give it a try!

Any questions? Feel free to ask and I will try to answer them in the comment section of this post.

Happy Making!


Wednesday, August 15, 2012

Quick Sticks Card Caddy: A Tutorial for a most excellent quick stitch card wallet

Necessity is the mother of invention. So yesterday my need for a slim little card carrying wallet kicked me into action and invention.

Recently, I attended a three day music and camping festival. It was hot and there was a lot of walking and wandering to be done at such an event. The trick is to carry a minimal amount of accoutrements on ones person, besides the ever present water bottle I wore a wee festival purse, nice and light weight with only the essentials. My wallet had to be left behind as it suffers from a spot of the syndrome known as The Costanza Wallet. What with my ID, credit cards, debit cards, library cards, health cards for the entire family, grocery market member cards, local business support cards, various business cards, and etc., It takes up a heap of room and getting out my ID and importants is a struggle. However, I found having these things loose in my wee festival bag was precarious, and I wished I had something compact and useful for the few necessary cards I was carrying. Something like a handy free-style pocket, as I am rather fond of a handy pocket don't you know.

I have found that such an item is not just good for the carefree festival days, but indeed an all year round, every day sort of good. Since I am not one to scour the interwebs for just the perfect item, or spend hours looking for a how-to that isn't exactly right; I simply got to work with a couple of scraps and my sewing machine.

The result was so quick in the making and most excellent in the cute and useful department that I thought I just had to share it with all of my friends here! So, enough of my rambling ways, let us get on with the Tutorial (the nitty gritty details)!

Ingredients:

A scrap of oil cloth - measuring at least 12" x 7" (30.5cm x 18cm)

A scrap of clear vinyl fabric - measuring at least 7" x 5" (18cm x 13cm)

Ruler, thread and scissors

Note:
You can find oil cloth and clear vinyl fabric in many fabric stores and some craft stores, and of course there are many sources on-line.

Note of disclaiming: My inches to centimeters conversion is approximate and untested, just sayin'.


Instructions:

Cut 2 pieces of oil cloth measuring 3.75" x 5.75" (9.5cm x 14.6cm)

Cut 2 pieces of clear vinyl measuring 2.25" x 3.75" (5.75cm x 9.5cm)

Place the 2 pieces of oil cloth together with wrong sides facing, raw edges meeting.

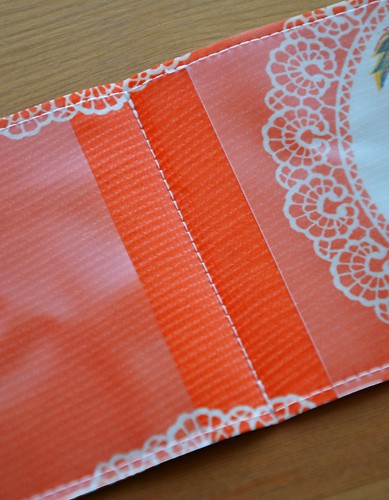
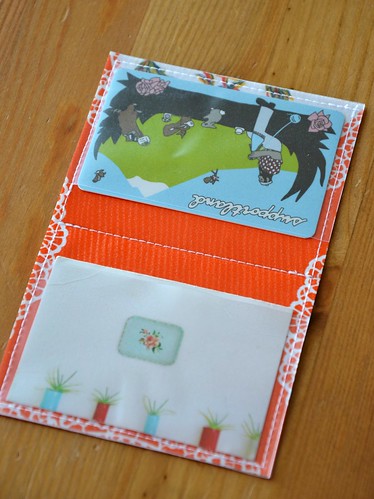
Place the 2 vinyl pieces even with the inside outer short edges of the oil cloth as pictured. (It is up to you to choose what side you want to be the inside of your wallet)

Take your arrangement to the sewing machine, using a straight stitch, sew 1/8" (3mm) from the edge and through all layers making sure to back stitch at the beginning and end of stitches.

This is the only tricky part as the materials are a bit slippy. If you are having particular trouble with slippage, use a bit of tape to hold the pieces together then remove them after stitching. I managed to contort my hands awkwardly enough to keep it together without tape, but it took some practice.

Once you have sewn the layers together, fold the wallet in half and finger press a crease down the middle. Sew a row of stitching down the crease as shown. Re-fold the wallet in half along the stitch line.

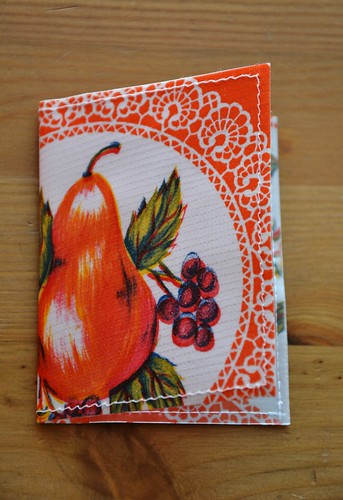
Next you need to... oh wait, you are done already! Holy smokes that was fast! Your Quick sticks card caddy is ready for action!


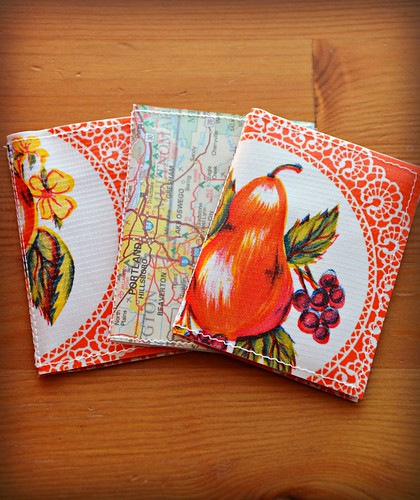
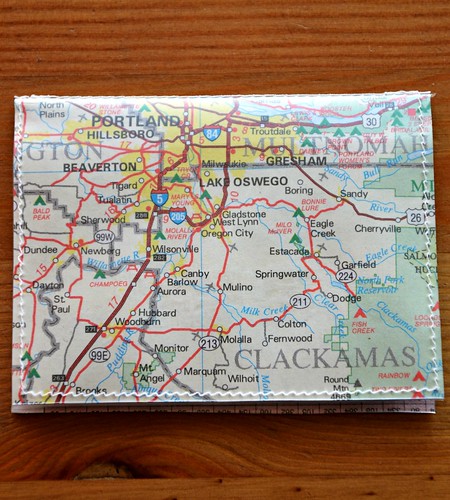
Once you make the first one and realize how easy and quick this project truly is, you'll want to make some more. I made 3 in no time! I even tried out making one from all clear vinyl, then slipped a cut piece of an old map in between the outside and the lining, tres hip no?


Uses:
ID Holder
Card Caddy
Business Card Carrier
Gift Card Presenter
Slim Bi-fold
Stocking Stuffer
and on, and on...

You could make the wallet with out the clear vinyl, you just wont be able to see through to the cards. You could make it out of felt as well.

Well, I do hope you have enjoyed this quick stitch tutorial! If you have any questions, ask away. And as always, if you make one I would love to know about it; please upload a photo of your card caddy to my Flickr group HERE!

Happy Stitching!