
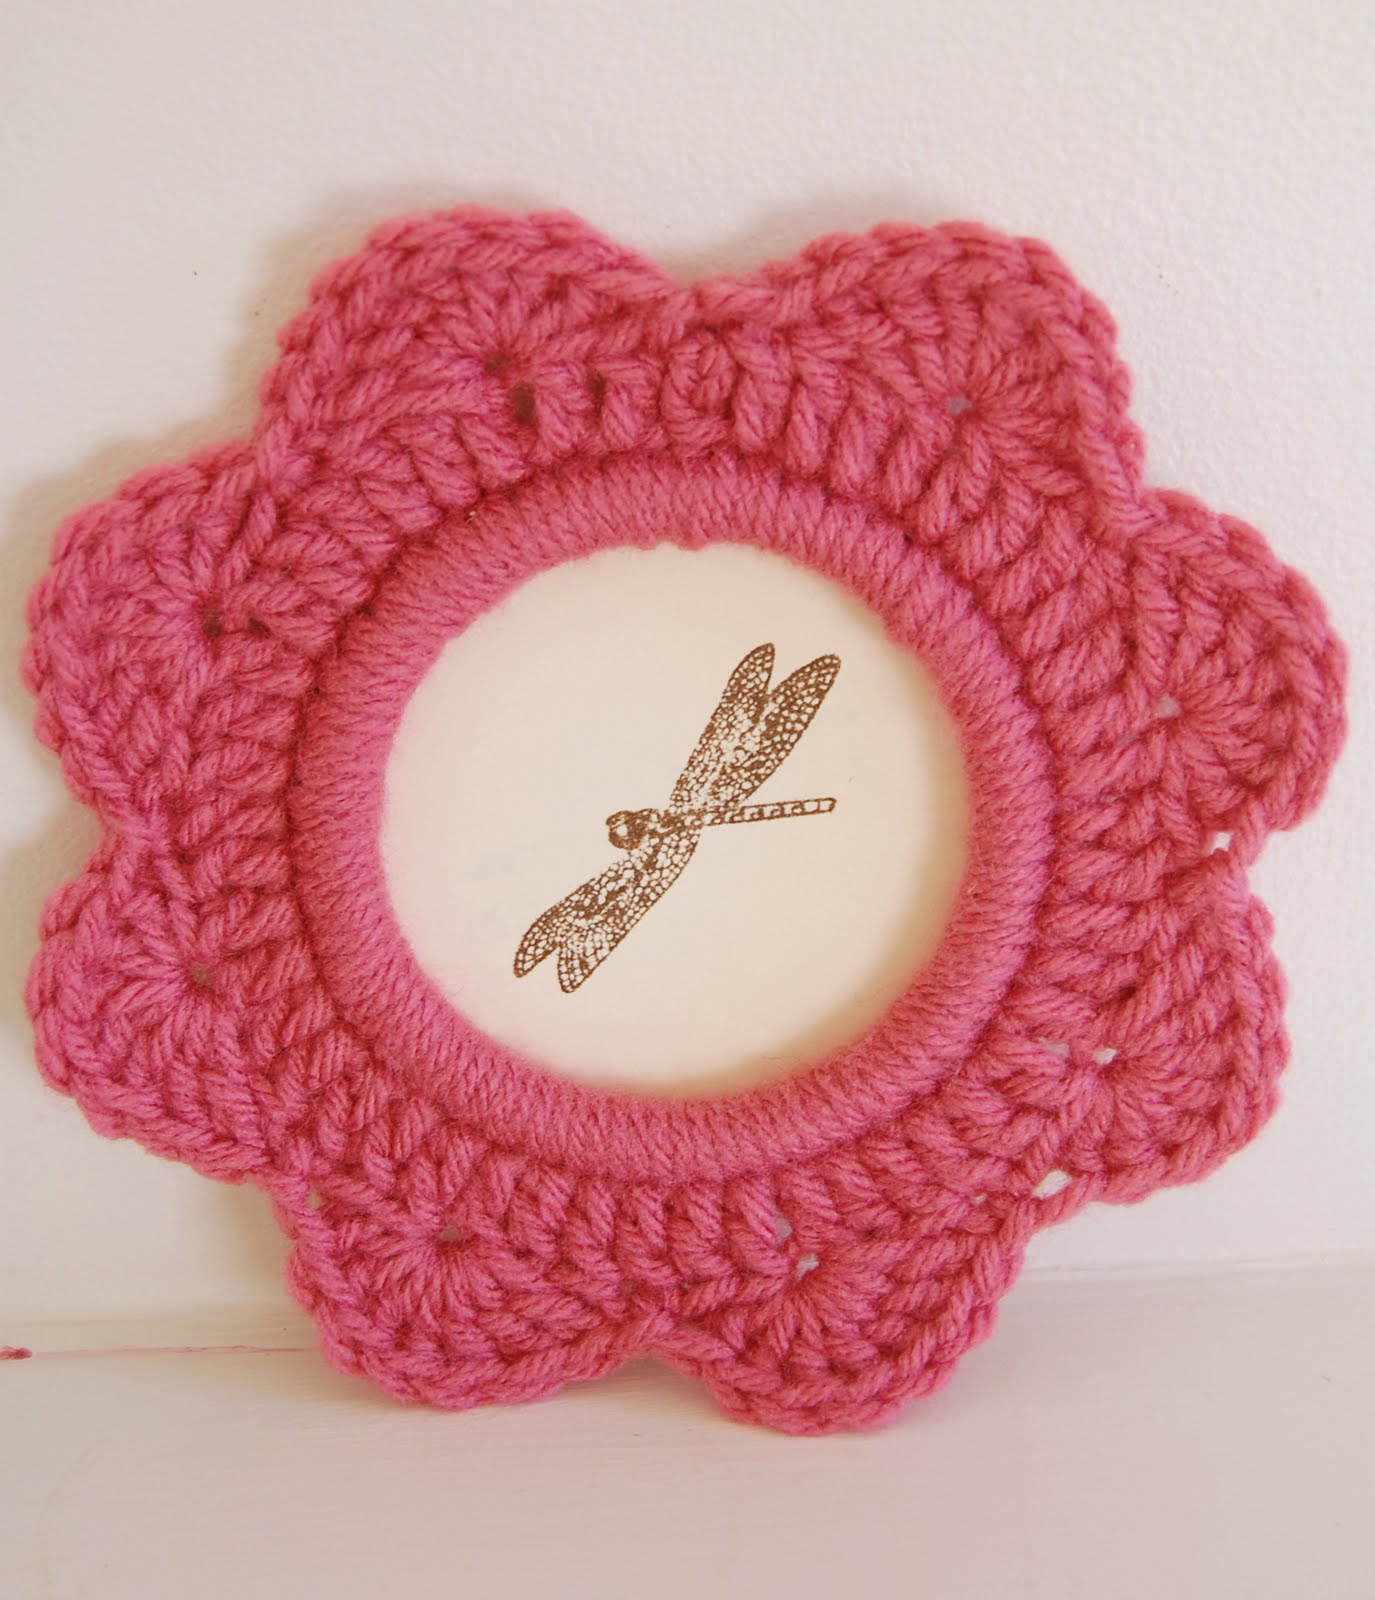
 Well, here we are, my first crochet tutorial! This is ever so exciting. I keep finding new ways to use these 'Mary Go Rounds'. I've just discovered they make the most whimsical little picture frames. And of course they can be worn as bracelets for the daring and discerning fashion forward among us.
  I am including a whole lot of photos in this tutorial hoping they will be a help and not a hindrance.
Let's get down to business shall we?
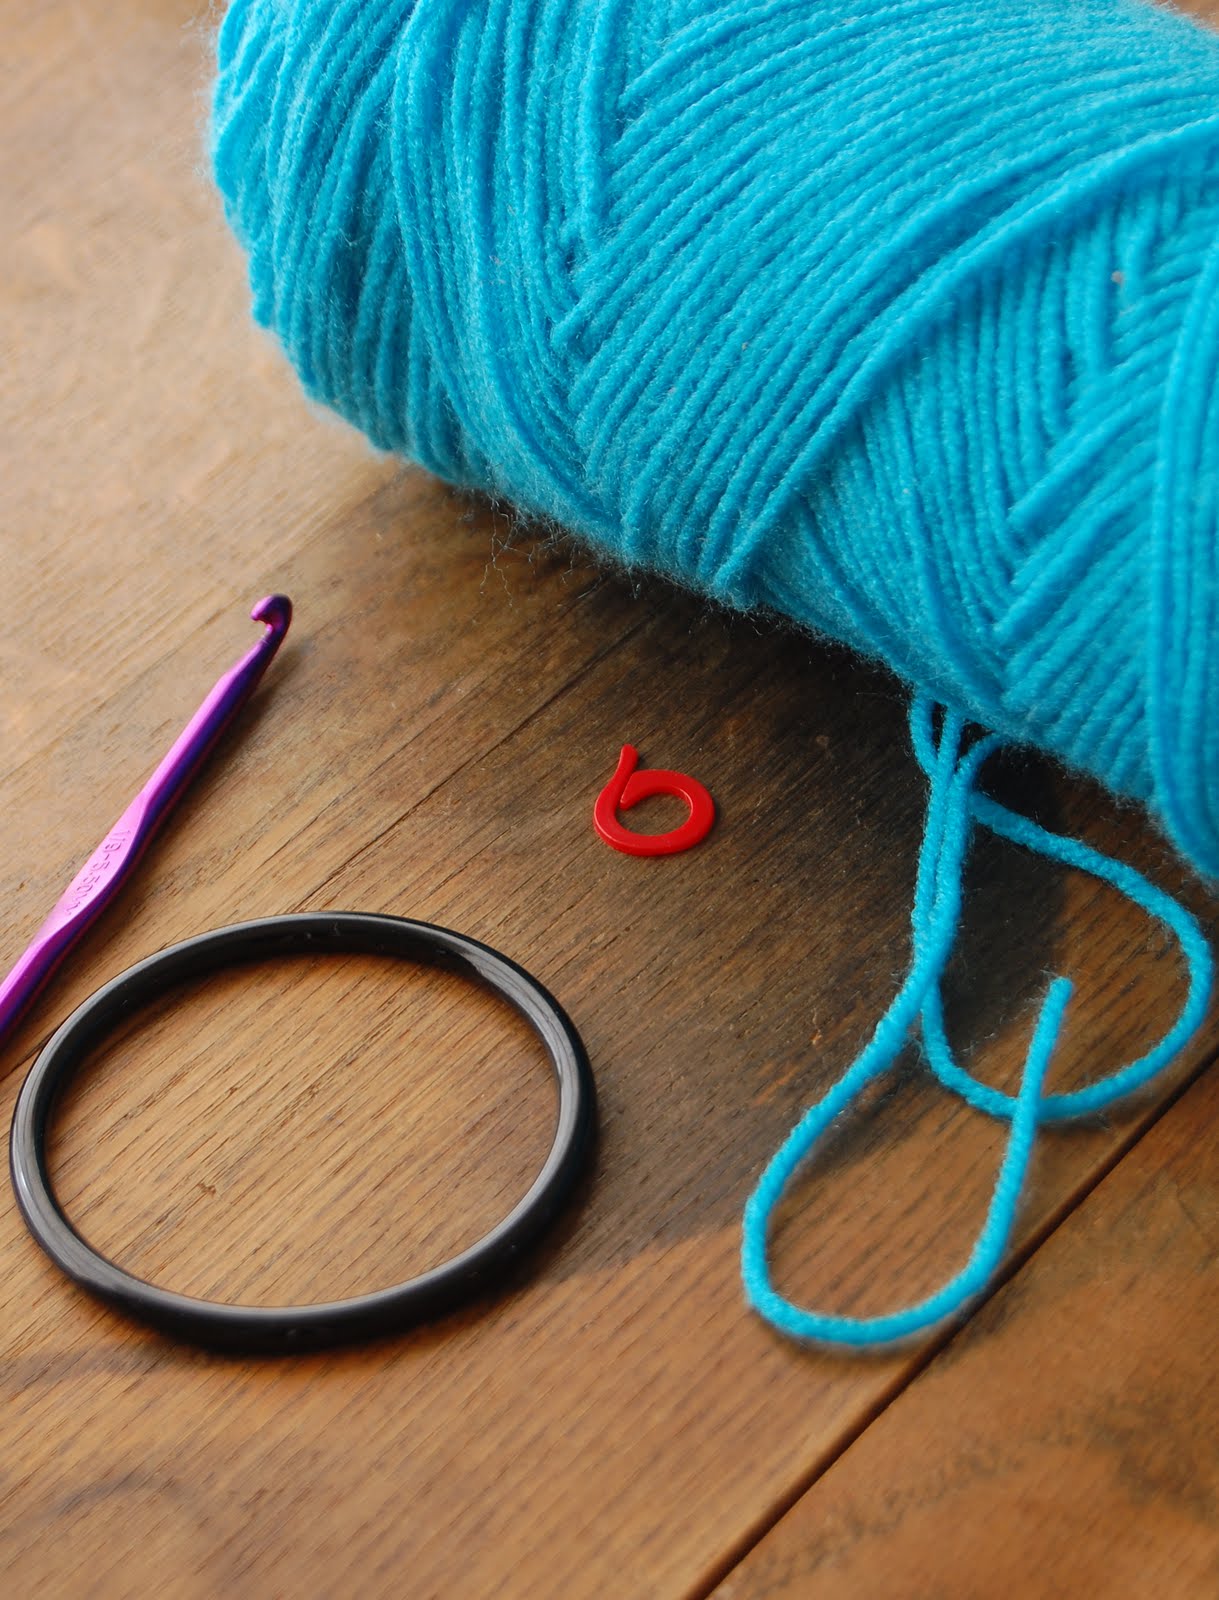
Materials:
* A bit of yarn in a color that makes you happy ( I have used mostly odds and ends of worsted medium weight)
* Your trusty crochet hook ( I used an H/8 - 5.00mm hook)
* A stitch marker (optional)
* A bracelet that you are ready to upcycle into a bit of crochet loveliness. It should be a stiff, non-flexible material - plastic/metal/wood etc. ( I raided Pony Girl's dress up box, the local junk store and thrift. Just some very cheap costume jewelry, keep an eye out at yard sales too.) The more plain the bracelet the better.
Techniques Used: I am using US crochet terms, for UK Terms click here
* Slip Stitch (sl st)
* Chain Stitch (ch)
* Single Crochet Stitch (sc)
* Double Crochet Stitch (dc)
* Tying Off and Sewing In Ends
All photos can be clicked on to enlarge
Begin by attaching your yarn to your hook with a Slip Knot.

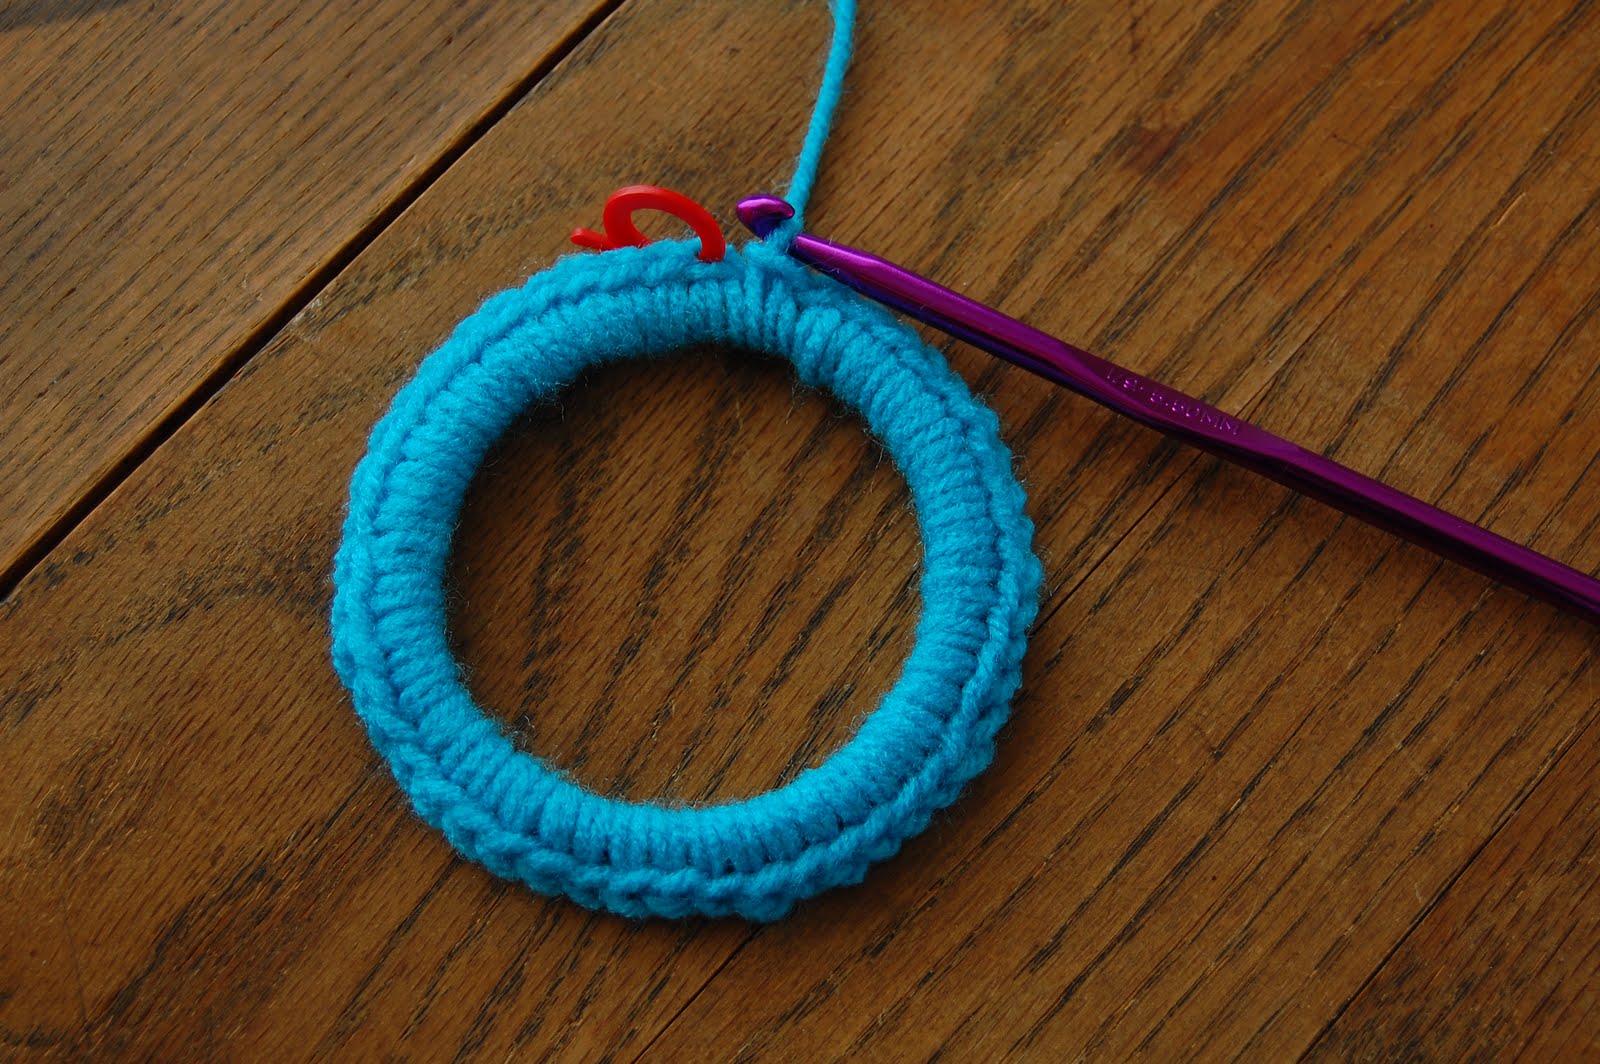
Round 1
Attach the yarn to the bracelet with a Slip Stitch

Chain 1, this counts as your first Single crochet stitch. (If you are using a stitch marker, this chain is where you would stick it.)

Begin working Single crochet stitches into the ring/bracelet.


Continue with the Single crochet stitch around the bracelet. Work 48 Single crochet. Including your beginning chain, this makes 49 stitches (sc).
As you go, slide your stitches close together so there are no gaps where the bracelet shows through. Adjust the top of your stitches to the outside of the bracelet as you work.


Once you have your 49 sc, join the round with a Slip stitch into your first chain.

Round 2
Chain 3, this counts as your first Double crochet.


Work 1 Double crochet into the next stitch, continue working 1 Double crochet into each stitch of the first round. 49 dc including beginning ch 3.
 Straighten your work as you go.
 `
`At the end of round 2, I count my stitches to make sure I have 49 including my beginning ch 3.
Join the round with a Slip stitch into the 3rd chain of your beginning ch 3.


Round 3
*Skip 2 stitches, then Double crochet 7 times into the next stitch.

Skip 2 stitches, then Slip stitch into the next stitch.*

Repeat this this pattern - between ** around the bracelet.

You will be working 8 shell clusters in all. Join the round with a slip stitch into your beginning stitch.


Tye off yarn and sew/weave in loose ends. What a sweet 'Mary Go Round' you've made!

I hope that this tutorial is clear. If you have any questions, or notice that I have made a mistake, please let me know. If you decide to make a 'Mary Go Round' or 6 (they are addictive) I would love to see!
This would work on rings of different sizes too. I have tried it on a smaller and larger ring. Working your first round in multiples of 7 stitches seems to be the key for getting the shell edging to work out.
Happy making!
Lin, a reader, sent this comment which has a helpful correction in my pattern. Thanks Lin!
If you change the size, it should be by adding or subtracting a multiple of 6, not a multiple of 7.
In the original, you have eight sets of six stitches - you skip the first two; double crochet into the next one; skip two and slip stitch into the next one.
You usually don't count the turning chain as a stitch - I think that's where the confusion comes from since it gives you 49 stitches instead of 48. 6 x 8 = 48.
In most patterns, you just need to count the number of stitches you used in the previous row to make your repeat to produce the design. Then add that number to the beginning chain. If you want it smaller, you subtract that number from the chain.
Edited to add: I attached the pictures to the frames by gluing them to a slightly larger circle of felt, I then hand stitched the felt to the back of the crochet frame.
97 comments:
Brilliant! Sounds very clear to me, and I want to try making one, or 6 of them... Just need to find a ring, I'm off to hunt one around the house!
They are simply adorable! Thank you for sharing. As soon as I find some bangles I will have a go. Thank again.
x
Very thorough tutorial, and I love the idea of using them as little picture frames. Thanks!
Wonderful tutorial...want to find some bangles now so I can have a go!
I love this! I wish I had some bracelets to try it on right now. Gonna have to find me some. I think the picture frame idea is perfect. :)
Your directions are very good. I do know how to crochet but if I didn't I would be able to follow along without a problem...I have found my H hook and been to two thrift shops in my little town but came up empty handed so off I go to the bigger town. I am so excited to get started on this, thank you so much for taking the time to share this with all of us. Maybe some of us can share with you or post how ours turns out.
Have a great day.
They look gorgeous! Great tutorial!
I am glad you decided to leave the pumpkins out of the photo shoot (ugh!) I might have to have a go at these because my 7 year olf fashion forward (well she seems to think so) daughter is looking over my shoulder oohing and aahing.
Oh these look great, thanks for sharing. I will have to 'borrow' Missy's bracelets while she's not looking, x
How wonderful, thanks for sharing, I would love to wear some of them.
I can't crochet to save my life but they look amazing displayed on the wall. Perhaps I should give it a go, your instructions look so good ...
Lola...
This is the most fabulous tutorial...
I love these and can't wait to get crocheting...
Thank you my dear...You have given me such inspiration!!!
Fantastic! Thanks for sharing this, I will have to give it a whirl..
Great job! I'm not really sure how to do a double stitch I think, but I'm inspired to try and if I can't do it I'll make it up :)
I love them as frames! Thanks for sharing!
Very clear tutorial. I have been crocheting since I was a little girl. I come and go with my enthusiasm. The little frame idea is very cute.
I work on large ambitious projects.
Which probably why, my enthusiasm sometimes wans.
looks lovely!!
am I game to try..I don't know if I am.
i love it though ♥
Fabulous... what a terrific idea & a great tut... Thank You... Bethel
Cute! Thanks for the tute!
YOU CLEVER, CLEVER CHOOK! I've been wondering aimlessly around the house avoiding housework and the work stuff, desperate for a quick crafty hit. NOW I know what this day is for!
Dear Lola,
they look gorgeous! Great tutorial!
Thank you so much for sharing.
Many Greetings,
Marion
This is so cool! I love it on the wall but especially on the pumkins!!!
Yvonne
We must be on the same wavelength...I've been working on the same type of idea for the past week! LOVE these!!
Such a wonderful idea! I love your Mary Go Rounds! There are actually some gold bangles in my jewelry box that I can't wear because they are too big. This is the perfect idea for what I can do with them! Thank you, thank you, thank you!
how lovely, I will be giving these a go - my walls need a bit of crochet adornment!
What an absolutely brilliant idea, thanks for sharing!!! :)
Vivienne x
lovely tute. these are so pretty,i cant wait to make a bunch! thank you
i just blogged and included you in my post :o)
Having a bangle conveniently sitting on my dining table as I was reading your tutorial, I was able to whip up one of these fabulous frames in no time! I used yellow yarn so it looks delightfully like a sunflower. Thanks so much for posting this!
Great tutorial. So simple and clear. Thanks for sharing. I found you through Coco Rose Textiles and I absolutely BANG! fell in love with this little framie thing. Had to share it with my followers with links and all. Funny how something so simple can make me extremely heart skippy excited. Thanks again.
Wow , love these !!!
Found you via coco rose. Thanks for the great tutorial :0)
Jacquie x
love this - great tutorial!
Thank you for leaving a message on my post! You have completely inspired with your gorgeous tutorial, and I think you may have started a frame craze in amongst Blogland! he he!!!!!!!! They are totally addictive and completely wonderful!!!!! Thank you so much for sharing such a brilliant idea and a completely fab tutorial!
Best wishes Vanessa x
p.s I would love to share the pics on your flickr group
I've just found this through coco rose - don't know how I missed it as I am a follower. Brilliantly clear tutorial - thank you. I'm off to raid Miss 7's jewellery stash right now! Byeee.
Have a super weekend!
Carmel
fab tutorial thankyou!
Wow! Beautiful pictures, beautiful blog! Thanks for the tutorial!
Excellent tutorial! I'm just learning how to crochet, so I hope you'll have more tutorials!! ~kaholly
oooh, I just made one, they're super cute!xx
What a wonderful idea and the tutorial was so very clear too. Thanks!!!
Thank you for your nice frame. As reward I want to give you this flower project: http://www.youtube.com/watch?v=W0W2W1_YAg0&feature=channel. I had fun with it too!
Rox
Thankyou heaps for this tutorial - I was after an easy and quick christmas ornament project and this was it!! I used the little plastic rings that come off our plastic milk bottles which I always have to throw away otherwise so it is a great repurposing project!
Thanks again!! :)
A great great tutorial and an amazingly awesome idea! LOVE it.
Have a happy weekend. xx
Hi There Lola,
just wanted to thank you for your wonderful tutorial - I have been having great fun this week making my own crocheted picture frames - have blogged about them and linked back to your tutorial, so hope thats ok with you - Elaine x
Lovely and great idea! Thanks for the pattern! :)
Hi, I've just come across your blog today and I love your flower ring tutorial so much that I've blogged about it on my review blog so that I don't lose it!
I've linked back to your post but I'd love to use a photo or two too if that's ok - all acknowledgements would be made to you. http://trulygoodwoman-reviews.blogspot.com/2011/01/reading-blogs.html
I'm looking forward to reading your older and more recent posts too.
Liz x
www.trulygoodwoman.blogspot
Just stumbled across this and wow it's a brilliant idea. Definitely a smashing little idea to post to the Gran in Law. Off to hit the shops tomorrow - there is a shop having a jewellery sale so I might just have a grab some bracelets.
Me han encantado, y he decidido hacer los míos, además de que he puesto un link de tus indicaciones en mi blog, http://lberloz.blogspot.com estoy ansiosa por subirlos a flickr también. Gracias
Thanks for this great tutorial! These little frames are just adorable :-)
This tutorial is so simple to follow, I really love it!
Can imagine these to be so beautiful.
La
Thank u!! Here's mine:
http://emiliepysslar.blogspot.com/2011/06/det-bidde-en-tavla.html
Hi Lola... I wanted to try the tutorial since I saw it..
and finally this morning I found the perfect bracelet, and try it.
it works!
(tho mine was using 77 sc, instead of 49sc)
here's mine
http://www.flickr.com/photos/zuperdzigh/5813852057/in/photostream
thanks a lot
I still have 3 more bracelets to make another frames :)
Hi there - I have just finished making my first one and it is midnight! Thank you so much for the great tutorial.
Lovely!
Hello Lola, I've just made one! It's so cute... Gonna make a bunch of it... Thanks for sharring this great pattern !
This is the best tutorial which I've ever seen!So simple, easy, creative and nice!Thanks, I'm going to do it!=)
Hugs from Hungary
I'm so giving this a go - thanks for the tut
Thank you for sharing - these are so cute!
Great tutorial for an adorable idea. My lil brain is spinning with all sorts of ways of using this. Tks!!
Fantastic tutorial, really great job! I love the way you arranged them, very adorable. I used to make these and put them on my Christmas tree, a few with a family photo at the center. Instead of a bracelet, though, I used the plastic soda can six-pack holders, cut apart to make six separate rings. They're lightweight and hold the form quite nicely. Just thought I'd throw that recycling/re-purpose idea out there.
Found you via Northern Hi-Lights:) I've been looking for a sweet something to make my MIL for her birthday, and these will be perfect with pics of the grandkids inside!! THANK YOU for sharing!
Hello Thanks for your tutorial , I have just made one! Just got to find a picture to put in it now! xx
Beautiful idea and a clear tutorial.
Am off to raid my enormous stash of bracelets...
..the housework will have to wait.
Thanks fo sharing.
Am new follower too.
Xx
thank you so much for sharing this! It is inspiring me for christmas gifts! x
This is way too cool! I'm currently in the middle of making one, on the double crochet row I did [1 dc ch 1 sk 1 st] rep so that there are gaps through which I can weave a ribbon! :)
I have one question, how do you attach pictures in order to make it a frame? I'm considering hot glue, but if there is a better method I'd like to use it!
Thank you to everyone for your wonderful comments! I have edited my post with a brief explanation of how I attached the pictures to the crochet ring! Hope this helps as some of you have asked , but I am unable to reply directly to some of you due to your settings.
Thank you!
Thanks for the picture bit, makes so much sense! :)
I loveeee it! thank you for the amazingly detailed tutorial with photos and tips to attach felt too! thank you again! will get addicted in making these!
susan
Tutorial was very easy to follow. Great idea to use these as frames....I would love to see if I can crochet the same edging around an embroidery hoop and have it be the frame to my embroidery work!
Your tutorial was perfect! Very easy to follow and the the pictures were excellent. What a pretty and fun idea. Thank you.
Marianne
So cute! i love it.
Just thought I would leave another suggestion for repurposing/upcycling...You can save the lids off of margarine tubs and the like, cut out the middle and use that as a ring. All size lids can be used. I started using these for crochet mobiles I was making and have since asked all of my friends to save them as I never run out of uses. Voila!! Yet another cool crochet project to try them with. Thanks so much for this free pattern!!
Hi Lola, Lovely Idea and like your blog... you got a new follower now :)
Happy Crafting
Simply lovely! I'll try to do it in square shape as a photo frame (a gift for my mother).
It does seem addicitive in round shape!
Hey Lola, thanks a lot for your lovely idea!!! I made these little beauties following your pattern.
The fair-pink one though is stuck on the picture the other way round !!!. Thanks a lot for taking time in putting up the recipe!!!
Link for the Photos here:
-https://www.facebook.com/photo.php?fbid=240550866053526&set=a.141835375925076.26804.100002958430501&type=1&theater
-https://www.facebook.com/photo.php?fbid=240134169428529&set=a.152428248199122.29461.100002958430501&type=1&theater
This is an awesome tutorial! I would love for you to link up at my new link party for the fiber arts!
http://www.mymerrymessylife.com/2012/06/new-link-party-hookin-on-hump-day-1.html
wow this is amazing! the hoop makes your stitches absolutely perfect :) very pretty pattern, thank you!
delicious!!!!!! thank you very much for sharing!!!
manu
Thank you Lola!! i made a wonderful pair of earrings!!
http://manumanu64.blogspot.it/2012/07/orecchini-crochet.html
thank you!!!!!!!!!!!!!!!!
Manu
Thank you for this lovely tutorial, so easy to tag along to, I think I see some picture frames in my near future!
When i am single crochetting on the bracelet my stiches are too low. Pls help
Grazie per averci dato delle indicazioni così chiare e precise! Ci proverò!
Un abbraccio
Savina
Thank you thank you very much for this tuto!! I can't stop any more!
Thanks a lot ! Such a good idea ! I'm going to look for these rings ! It's urgent know !!
I love how you have photographed these,
I have made them before, but always wondered what to do with them....now I know!
I thought the other thing to do would be to make a 'mobile' thingy to hang up?
bestest to you alex, superb tutorial
Daisy J
Outstanding! The pictures makes the tutorial so easy to understand ..... thank you!!<3
Thank you so much for sharing that tutorial!
I had my first crochet class last monday and this little frame was my very first "finished" project, I love it!!
Now I think I am folling into a new addiction, crocheting is great!
thanks again,
Hermine (PommeCoing)
Thank you for this tutorial ;-)
Mary Go Rounds is beautiful
Lovely! I've just finished one, however i didn't have enough stitches to form a full shell at the end :( I did 70 DC (including the chain 3), so a multiple of 7 as you said, but it didn't work. I counted and checked again, there are 70 and I didn't miss a chain...
Any idea why that could be? Or has anybody else tried changing the initial number in round 1?
Thanks for your help!!! I would love to make more to give as Xmas presents :)
Lovely!Thanks!
Amazing! Thanks a lot!!!!
Thanks! I started making these around curtain rod rings. Going to hang up my cafe curtains with these (obviously not going all the way around with stitches) :)
Bravo
If you change the size, it should be by adding or subtracting a multiple of 6, not a multiple of 7.
In the original, you have eight sets of six stitches - you skip the first two; double crochet into the next one; skip two and slip stitch into the next one.
You usually don't count the turning chain as a stitch - I think that's where the confusion comes from since it gives you 49 stitches instead of 48. 6 x 8 = 48.
In most patterns, you just need to count the number of stitches you used in the previous row to make your repeat to produce the design. Then add that number to the beginning chain. If you want it smaller, you subtract that number from the chain.
I'm making six of these in different sizes for my daughter's room. Thanks for the pattern.
Thank you so much Lin!
Hiya,
Your flower frames are stunning.
I would like to make my own for Christmas gifts but I would like to know the diameter of the bangle you used so I can buy multiple of the same size.
Thank you
My grandma used to crochet these around rubber mason jar sealer rings. Can't remember what she used them for. Coasters?
That's really pretty. I wish I could also do crochet. My grandma taught me how to do simple crochet but it just got tangled and I try over and over and over again but still I can't do it. Maybe it's not really for me. Hahaha
Random Ebullience
Thank you so much .
I just done one and posted a link in my blog
caticoud.canalblog.com
wow this is so funny, I love picture frames that you make, whether you can make vidio tutorial?
Fab tutorial. Love to search for anything regarding diy crochet pattern.More fun to do with this one !
Post a Comment