
 Last week whilst I was sweeping up the little green cottage, a light bulb popped on over my untamed curls. It was the shiny light of an exciting crafty idea, the kind that keeps one up all hours mulling it over.
You see, in my making, I end up with scraps of fabric in all shapes and sizes. There is a sort of loose organization going on with my save piles. I do hold on to cherished bits and vintage darlings. I keep especially, the long straight-ish strips of favorite fabrics, selvedge ends, cuts from quilting, anything stripy. Recently I had taken note that my basket of strips was bursting and threatening to make a run for it if I didn't make use of them quickly.
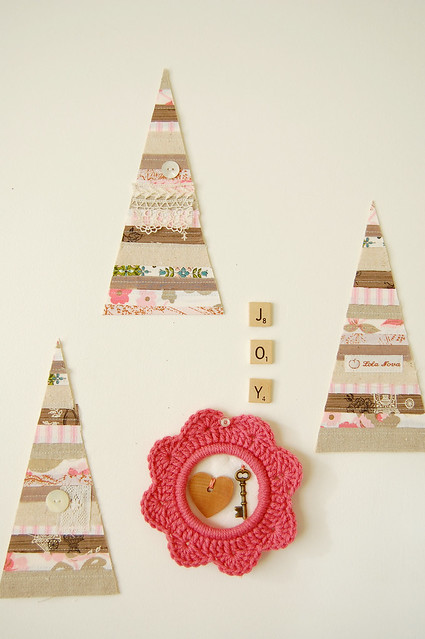
And so...long story short, I started having a bit of a crafty revolution, making up all sorts of goodness with my runaway strips. In this 'how to' I will show you how to make those stripy trees in the top picture. However, the technique I'm going to show you is limitless in it's possible applications. It is so easy peasy and slightly addictive ...or maybe it's just me.
 Here's what you'll need:
A collection of fabric strips in varying widths (none of mine were over an inch wide).
Some cardstock paper
Scissors
Thread
Glue stick (optional)
Sewing Machine
some buttons and bits of lace or ribbon
 Now, choose a bunch of strips that you like and start laying them out together in an order that is pleasing to you. Grab your cardstock (in this example, I am using an A4 piece that has been cut in half lengthwise). I make sure that I have the right amount of fabric strips to cover the entire piece of cardstock.
Pick up your first fabric strip, I work from the bottom up. Place your fabric strip so that it is even with the bottom edge of your piece of paper.
 If you like, you can use a small bit of glue to hold it in place. If you are using glue you will want to wait a few minutes to let it dry before going to your sewing machine and use the smallest amount so that it doesn't goop up your machine.
Now, take your paper and fabric to the sewing machine and simply straight stitch down the middle of your fabric strip, attaching it to the cardstock.
 Choose your next strip of fabric and place it next to your first strip, slightly overlapping the sewn strip.
 Stitch this strip in the same way as the first.
 Continue repeating the process with all of your strips, remembering to overlap each one slightly. Or, you could lightly glue all your strips into place first, allow the glue to dry and then stitch them to the paper.
 Once you have finished, turn the paper over and draw equal triangles onto the cardstock. I used a ruler and a pencil to make my markings. I was able to get 6 equal triangles out of this piece, with 2 half triangles left over.
 Cut along your lines and voila! you have 6 lovely stripy tree triangles.
 Aren't they nice? Oh, they could use a little something though. Time to break out the buttons and lace.
 Sew on some buttons, a label, some lace or ribbon, whatever strikes your fancy!
 At this point, you could turn them into some pretty groovy tree ornaments by either sewing or gluing two of the triangles back to back. With a good size needle, sew some embroidery floss or yarn through the top to be able to hang it.
I decided to turn these into a happy little garland.
 Depending on what fabrics you use, this technique can look quilty or pleated, it's pretty fun to see what you can come up with. You could make this a 'no sew' kid friendly project too just by using a bit more glue. There is no limit to what you can make with this process.
 I think it would make a pretty great stitched postcard!
 I turned some of the small left over bits into gift tags by sewing another piece of cardstock to the back.
 I even turned some into little birds on a string of ric-rac, tweet!
 I hope you have enjoyed this simple 'Happy How To'! If you make some trees or use this technique to make other clever stuff, I would love it if you added photos to my flickr group!
 Have a happy happy day!
36 comments:
oh these e really nice!thanks for sharing:)
Really CUTE! LOVE the birds! ~tina
Such a great idea Alex, and I can see how the addiction would take over very easily - endless possibilities!
I may use up some of my tiny scraps in just the same way :-)
Today I went to the post office and your package is now finding its way across the Atlantic to you :-)
Denise x
Oh I love it all!!! How cute - you could even put the birds and the trees together in a garland.
how very very cute...sigh, I wish I were crafty and creative. But I am a patron of the art.
Gorgeous, GORGEOUS!!
Very cute! I'm loving' your how-to's Lola. They're all on my to-do list. :)
You are a genius!!!! I have way too many tiny scraps, now I have an excuse to keep even more - those birds and gift tags are just wonderful! Now I just need a little time to get busy.... x
I love this idea, especially the birds and the little tag. I never throw away my fabric scraps, and now I have something I can make with them. Thanks so much for this little tutorial! :)
My, you've been busy! LOVE the ideas AND the colors you used. Can't wait to use up some of my scraps!
How absolutely clever - my next new project!
What a great idea can't wait to try it out. I especially love the garland and I am always wanting interesting labels. Can't wait to try this.
Fabulous! love what you've made with the off cuts too!
You are so creative these are all absolutely beautiful. Thank you for sharing:)
I am defiantly having a go at the birds, when I get a minute. Such a simple idea who knows why it hadn't occurred before. Love it.
i love it lola! i especially love them in their gleeful, most jaunty garland above your fireplace :)
the birdies turned out peachy too... and i think most of all i love the idea of the postcard! how lovely to send as a gift/card in one, brilliantly brilliant i say, thank you for sharing my dear :)
Alex, those are super awesome.
I might get Moo to do something with this idea. We have school holidays coming up and I'm sure she will be asking to use my sewing machine!
I love it all! My very favorite is the gift tags, I wanted to make them this year and this seems like just the ticket. I so enjoy these spur of the moment creations that you have been coming up with, they are such happy things!
Oh! I like your version of ornithology. A lot.
That was one genius light bulb moment going on over your untamed curls!
I LOVE them all!! I shall certainly make some of these lovelies :)
What an absolutely brilliant idea, thanks ever so much for sharing it with us!!
Vivienne x
VERY CUTE! I love the idea of the gift tag. Great idea.
www.shutterboo.com
how lovely! and then a garland, oh this is now definitely on my wanna-do-list!!
Very cute, love the idea! These would be great attached to blank cards, too.
Superb! Love love love the ideas! I am determined to use this one. I don't know when, but I shall!!!
Love it! What a great simply idea, but exectured beautifully and so effective!
oh gosh, these are fabulous! I have soooooo many scraps that I just cannot bring myself to part with, and what better way to decorate AND use up stash that this. Thanks so much for sharing, oh gosh, I think I might just make a start on next years Christmas cards. These are delightful.
What a great idea! Thanks for the tutorial, I will be making some of those.
I came here via Whipup and I just want to say thanks for a great idea!
Oh! I have a (rather large) drawer of strips that are just itching to be turned into some of these! Thank you for the inspiration.
You know I just keep making your frames with no real aim in sight. I love 'em. And now you've come over all festive and I never, EVER throw out a scrap of ANYTHING. Wish me luck...
oh my goodness! how did I miss this, you are just all kinds of awesome, that is the cutest christmassy thing i have seen.
here I am thinking now..do I have time to whip these up.. ;)
hugs & happy day to you Ms Lola Nova ♥
w00t!!! What I have found. Thanks a lot for sharing these.
This has got to be one of the sweetest ideas for holiday I've seen yet!! How adorable!
cutest DIY EVERRRR!!
Love these and fantastic blog
Post a Comment